|
||
| Products Download Events Support Videos | ||

Technical Support
On-Line Manuals
MCBTSX1001 User's Guide
Setting the JTAG Clock
To get the best performance from your ULINK JTAG adapter, it's important to set the JTAG clock rate for the MCBTSX1001 board. The following steps show you how this is done.
- Power up the MCBTSX1001 Board.
-
In µVision, Configure the Debugger in the Project — Options
for Target — Debug dialog.
 Use the Options for
Target toolbar button and click the Debug tab to
display the Debug dialog.
Use the Options for
Target toolbar button and click the Debug tab to
display the Debug dialog.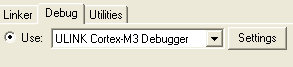 Select the Use: radio button and then
ULINK Cortex-M3 Debugger in the drop-down list to choose
the ULINK USB-JTAG Adapter as the debugging tool.
Select the Use: radio button and then
ULINK Cortex-M3 Debugger in the drop-down list to choose
the ULINK USB-JTAG Adapter as the debugging tool. -
Click the Settings button to open the Cortex-M Target
Driver Setup dialog.
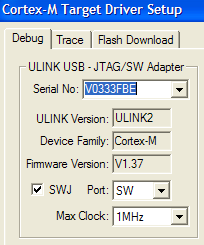 Select the SW option from
the Port: drop-down list to use the Serial Wire JTAG
interface of the Cortex-M0 device.
Select the SW option from
the Port: drop-down list to use the Serial Wire JTAG
interface of the Cortex-M0 device.
Since the Cortex-M0 device supports only Serial Wire JTAG mode, uncheck the SWJ checkbox.
The Max Clock drop-down list sets the highest JTAG clock rate used to communicate to the target board. When using a ULINK2 or ULINK-ME adapter, the 1MHz setting works best with the MCBTSX1001 board.
ProductsDevelopment Tools |
Hardware & Collateral |
Downloads |
Support |
Contact |