|
||
| Products Download Events Support Videos | ||

Technical Support
On-Line Manuals
ULINKpro User's Guide
Adding RTA Files to Your Project
When you add the Real-Time Agent RTA_Config.c file to your project, copy the file to your project folder and then add it to your project. To keep this file separate from your application files, create a new Group in your Project Workspace.
Note
- If your project uses RTX Kernel or RL-ARM there is no need to copy or add files to your project. You may proceed directly to Configuring the Real-Time Agent.
Copy the configuration file to your project
- Copy C:\KEIL\ARM\RT AGENT\TEMPLATE\RTA_Config.c to your project directory.
Add the configuration file to a new Group in your project
- Create a new Group for the files in your Project Workspace called Real-Time Agent.
- Add the file RTA_Config.c to this Group.
- Right click the new Group and select Options for Group 'Real-Time Agent'. Under the C/C++ tab, select Optimization Level 3.
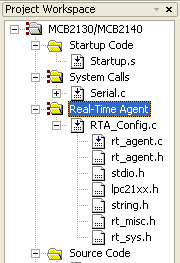 Your Project Workspace window should look similar to
this.
Your Project Workspace window should look similar to
this.
Notice the 3 red dots to the left of the folder icon for the
Real-Time Agent group. These dots signify the folder options are
different from the default settings. In this case, the dots reflect
changing the compiler optimization level to 3.
ProductsDevelopment Tools |
Hardware & Collateral |
Downloads |
Support |
Contact |