Keil Logo

Technical Support

On-Line Manuals

RL-ARM User's Guide (MDK v4)

RL-RTX RL-FlashFS RL-TCPnet TCP Socket Opening TCP Connection TCP Active Open TCP Passive Open Sending TCP Data Example for Sending Data Multiple TCP Connections UDP Socket Opening UDP Connection Sending UDP Data When DHCP Enabled When ARP Cache Empty Example for Sending Data IP Multicasting Multiple UDP Connections Configuring RL-TCPnet Static Configuration System Definitions Ethernet Network Interface PPP Network Interface SLIP Network Interface UDP Socket TCP Socket BSD Socket HTTP Server Telnet Server TFTP Server TFTP Client FTP Server FTP Client DNS Client SMTP Client SNMP Agent SNTP Client Error Function Runtime Configuration Library Files Using RL-TCPnet Stand Alone With RTX Kernel Event Driven Operation IP Address Assignment Ethernet Interface PPP Interface SLIP Interface Localhost Applications HTTP Server Script Language CGI Functions Ajax Support Using XML XML Example How it works SOAP Support SOAP Interface Large POST Messages Web Pages Default Page Error Pages Web on SD Card Web Update File System Interface Http Caching How it works Internal Web External Web Multi-user Authentication Using RAM File System FCARM File Converter PRINT Directive NOPRINT Directive PAGEWIDTH Directive PAGELENGTH Directive ROOT Directive Telnet Server Command Line Interface Multi-user Authentication Sending Reply Message Short Reply Long Reply Continuous Screen Update TFTP Server File System Interface TFTP Client File System Interface FTP Server File System Interface Multi-user Authentication Supported Commands FTP Client File System Interface SMTP Client SNMP Agent MIB Database MIB Interface MIB Entry MIB Table DNS Resolver Starting DNS Device Drivers Ethernet Driver Interrupt Mode Modem Driver Serial Driver Using Serial Link Cable Connection Modem Connection Windows Dial-up Add Direct Serial Link New Dial-up Connection Configure PPP Dial-up Configure SLIP Dial-up Debugging Enabling Debug Debug Level Redirecting Output Function Overview BSD Routines CGI Routines Ethernet Routines FTP Routines HTTP Routines IGMP Routines Miscellaneous Routines Modem Routines PPP Routines Serial Routines SLIP Routines SMTP Routines SNMP Routines System Functions TCP Routines Telnet Routines TFTP Routines UDP Routines RL-CAN RL-USB Example Programs Library Reference Appendix

New Dial-up Connection

Follow these steps to add a new dial-up connection in Windows XP.

  1. Open the Network and Dial-Up Connections applet located in the control panel. Open Make New Connection to start the Network Connection Wizard and click Next.

    Open Network Connect Dialog

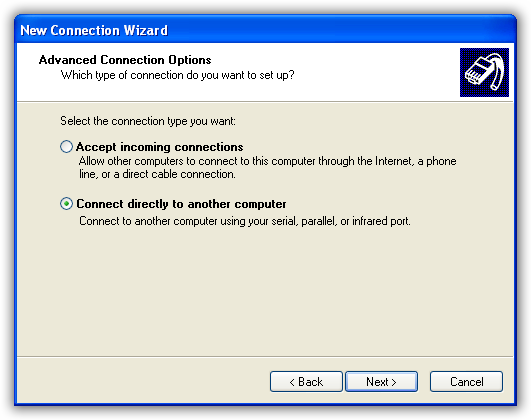
  2. On the Network Connection Wizard dialog, select Set up an advanced connection and click Next.

    Setup an advanced connection

  3. On the Network Connection Wizard dialog, select Connect directly to another computer and click Next.

    Connect directly to another computer

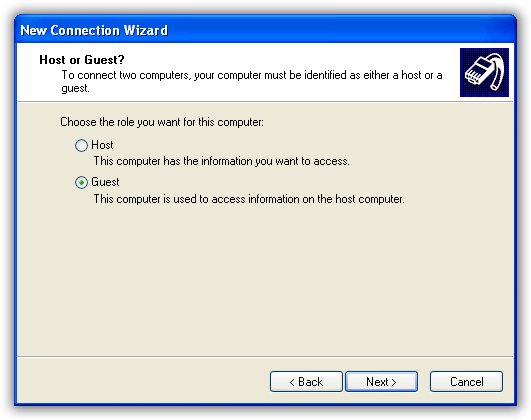
  4. On the Network Connection Wizard dialog, select Guest and click Next.

    Host or Guest

  5. On the Current Connection Wizard dialog, type in name for the new connection and click Next.
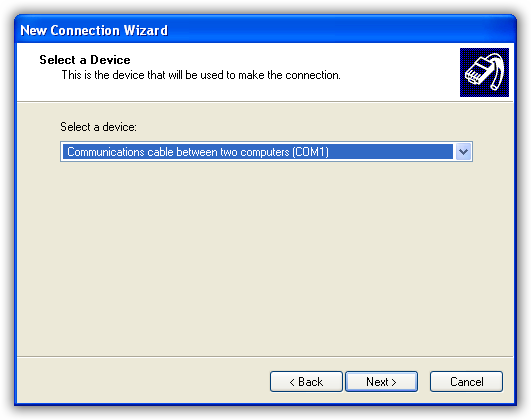
  6. On the Network Connection Wizard dialog, select the Communication cable between two computers… option from the drop-down menu and click Next.

    Communication Device

  7. On the current Connection Wizard dialog, click Next to allow all users to use this connection. On the next dialog, name the new connection and click Finish.
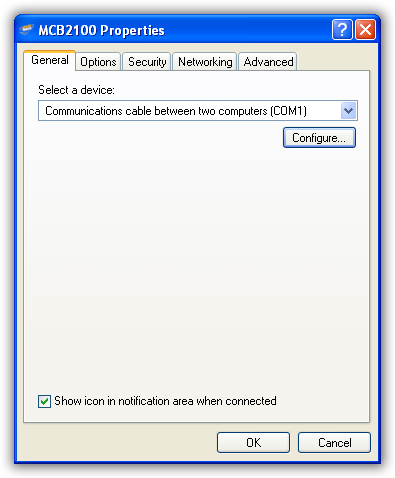
  8. The new dial-up connection dialog (Connect PPP) appears. Before using the new dial-up connection, you must verify the serial port speed. Click on Properties in the Connect PPP dialog.

    Connect PPP

  9. The PPP Dialog opens and shows the General tab. Select the device from the drop-down menu (if there is more than one) and click Configure.

    Congigure

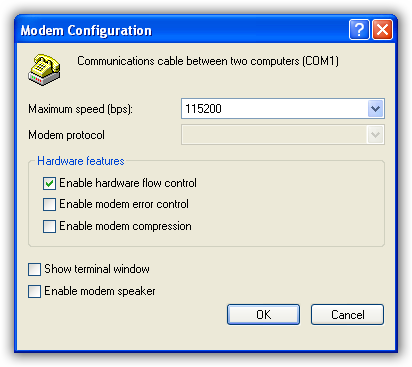
  10. The Modem Configuration dialog appears. Verify that the Maximum speed is set properly and click OK. The default Keil Evaluation Board baud rate is 115200 baud.

    Baud Rate Verification

  11. Click OK to close the dialog.
  Arm logo
Important information

This site uses cookies to store information on your computer. By continuing to use our site, you consent to our cookies.

Change Settings

Privacy Policy Update

Arm’s Privacy Policy has been updated. By continuing to use our site, you consent to Arm’s Privacy Policy. Please review our Privacy Policy to learn more about our collection, use and transfers
of your data.