 |
USB Component
Version 6.17.0
MDK Middleware for USB Device and Host Communication
|
|
USB Component
Version 6.17.0
MDK Middleware for USB Device and Host Communication
|
An USB Composite Device is a peripheral device that supports more than one device class. Many different devices are implemented as composite devices. For example they consist of a certain device class, but also an USB disk that has all the necessary drivers stored so that the device can be installed automatically, without the need to have access to a certain driver software.
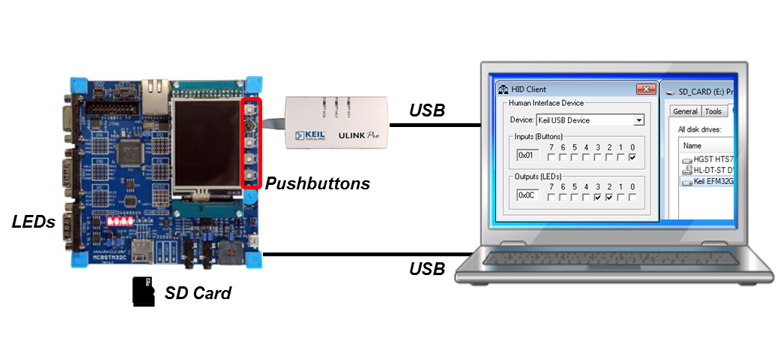
In this example, we will implement a composite device that is made up of two devices that have been used in the previous tutorials. We will have access to the development board's buttons (from the HID example) and the SC card (from the MSC example).
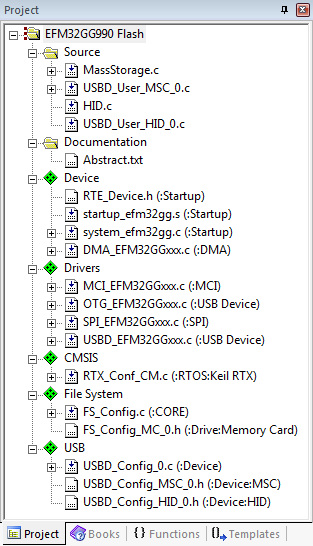
Open the MSC example project in MDK. From the HID example project, copy HID.c and USBD_User_HID.c and add them to the project. Open the Manage Run-Time Environment window. Add one USB:Device:HID component to the project. After clicking OK, you will see that the USB Component in the Project window will have an additional entry: USBD_Config_HID_0.h. As the HID example uses LEDs and push-buttons, you might need to add these Board Support related items as well. Check the RTE Component selection of the HID example for further detail. In total, it should display now a similar project structure:
Now we have two main functions in the project. We need to delete one of them. Open the MassStorage.c file. Copy the lines
to the HID.c file right before the lines
Insert
to the #includes at the beginning of the HID.c file. Afterwards, remove the MassStorage.c from your project. Now you have only one main function left.
Before running the program on the target hardware, you need to edit the USBD_Config_HID_0.h file. Open the file, switch to the Configuration Wizard and go to the Bulk Endpoint Settings. As the file is generic and has no information about other classes available in the project, the Endpoint 1 is configured for IN and OUT. This endpoint is already used in the USBD_Config_MSC_0.h file. So change the number for IN and for OUT to '2'. This will make the HID Component use the Endpoint 2 for data exchange with the USB Host and no conflicts will occur with the MSC class.
If you are using RTOS other than CMSIS-RTOS2 RTX5 for your project please make sure to satisfy USB Device Resource Requirements.
You may now build and download the example project to the evaluation board using the µVision commands:
After these steps, the project should start executing on your evaluation kit. In case of errors, refer to the Evaluation Board User's Guide for configuration information.
The setup of the Evaluation Board hardware is described in the Abstract.txt file.
The HID part of this example can be tested on a Windows PC using the HIDClient.exe utility (located in "C:\Keil\ARM\Utilities\HID_Client\Release"). The program runs stand-alone without installation.
Steps to check the USB communication using the client utility:

