The steps to create a microcontroller application with Graphical User Interface are:
Refer to Support in MDK-Professional for a list of supported emWin components and drivers.
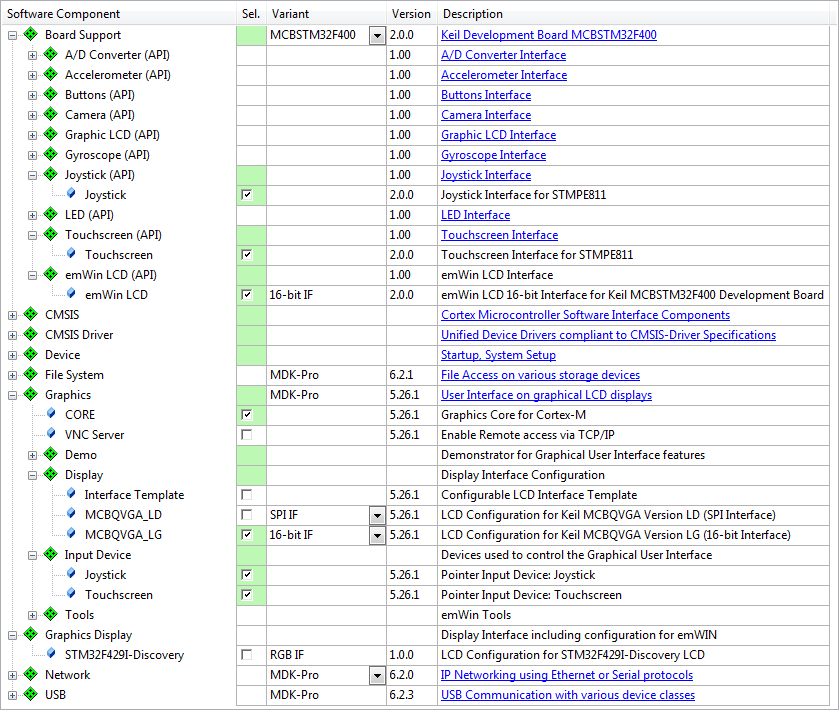
RTE Component Selection
Only a few steps are necessary to complete the RTE Component selection:
- From the Graphics Component:
- Select Graphics:CORE that provides the full emWin library.
- From the Display (API) select the preconfigured LCD Interface for your platform. If you are running on unsupported or custom hardware select the Interface Template. The User and Reference Guide - 34.4.2 Customizing LCDConf.c describes how to customize the Interface Template.
- Optionally you can now also add a Pointer Input Device like Joystick or Touch if present on your hardware.
- From Board Support:
- Enable emWin LCD. If there's no board support available for your development environment, refer to the User and Reference Guide - 31. Display drivers on how to create a suitable LCD driver.
- Enable Touchscreen. If there's no board support available for your development environment, refer to the User and Reference Guide - 24.4 Touch screen driver on how to create a suitable touchscreen driver.
RTE Component Selection
Add and Configure the GUI Template
files provide templates for running an application using the Graphics component. The following templates are available for the Graphics component (refer to Execution Models for further information):
| Template Name | Purpose |
| GUI_SingleThread.c | GUI Thread for Single-Task Execution Model |
| GUI_MultiThread.c | GUI Thread for Multiple-Task Execution Model |
| GUI_TemplateThread.c | Thread to run emWin Demos or Templates |
To integrate a User Code Template in your application, follow these steps:
- Open the Add New Item ... dialog by right-clicking a source group in your project. Select the Template emWin GUI Thread for Single-Tasking Execution Model from the User Code Template section.
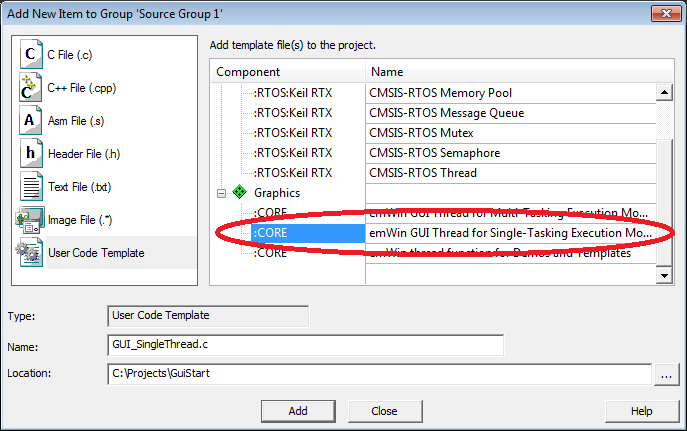
Add Template
- To start the graphics component just call Init_GUIThread(); from your main task.
- The GUIThread requires some additional resources from your CMSIS-RTOS Kernel.
In case RTX v5 is used no changes to RTX settings are necessary as all resources are allocated statically. In case RTX v4 is used you need to change following settings in file:
| Additional RTOS Kernel Resources | Value to add to existing resources |
| Number of concurrent running threads | +1 |
| Number of threads with user-provided stack size | +1 |
| Total stack size [bytes] for threads with user-provided stack size | +2048 Bytes |
Configure the Memory for the Component
The Graphics Component has some increased resource requirements. In most cases you will allocate external RAM (or some separate RAM area on your device) for the GUI buffer.
- Open GUIConf.c for editing. Set the GUI_NUMBYTES define to 0x4000. This will be sufficient for simple GUI dialogs. If you are increasing complexity of your GUI you also need to increase this buffer size.
- Run the Options for Component dialog from the context menu of the file GUIConf.c.

Context Menu
- In the Options for Component dialog select the RAM area you want to use for the Core Component. This will relocate the buffer in the selected area.
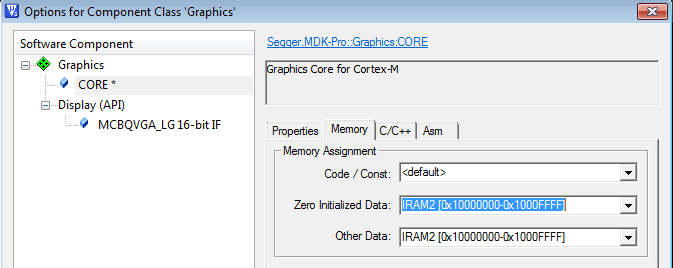
Options for Component Dialog
CMSIS-RTOS Requirements
If you are using a touch-screen device then timers need to be enabled in RTOS. Also, an additional 1024 Bytes of stack for the Timer Thread Stack size [bytes] is required.
For more information, check the Graphics component's Resource Requirements section.
Design a Dialog and Include in the Application
- Create a new Framewin by clicking the icon on the toolbar. Adjust the properties. First you need to rename the Framewin object. In this example we call it "myDialog". The name of the root object will also be reflected in the generated source file name.
- Adjust the xSize and ySize to fit onto your display area. If the dialog is larger than your display it will be truncated.
- Add elements of your choice using the GUIBuilder toolbar. Here we add a button called "Button".
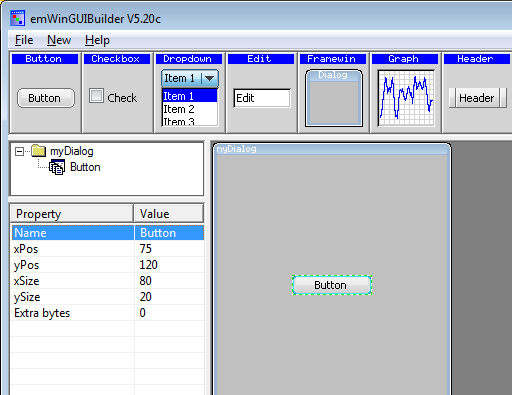
The GUIBuilder Utility
- Once you are done, save the file (File-Save...). A new file called myDialog.c will be created.
- Add this file to a source group in your project using the context menu:

Source Group - Add Existing Files...
- Open GUI_SingleThread.c in the editor. Add #include "dialog.h" to the includes. In the GUIThread thread loop call CreatemyDialog();
You will also need to add an extern declaration WM_HWIN CreatemyDialog(void);
The Graphics Component is now completely integrated in your application.


